How to disable Google Chrome Software Reporter Tool
Software Reporter Tool is a Google Chrome standalone process that monitors your Chrome install and reports if any add-ons are interfering with the normal functioning of the browser. The tool isn’t connected to the web but mainly used by the browser to recognize programs that may conflict with it. It’s visible as a 54Kb executable named “software_reporter_tool.exe“. If you face a high CPU usage for this process or if you frequently see a message Google Chrome Software Reporter Tool has stopped working; you might want to disable or remove it. Here is how you can do it.NOTE - USE Local Group Policy Editor (SEE BELOW)
UPDATE:
It is now called the Chrome Cleanup Tool.
But that too has been discontinued now. You need to use Chrome’s Malware Scanner & Cleanup Tool.
The user is completely unaware of the existence of this component, unless and until the user deliberately searches for software reporter tool. So the question is what is the role of this Chrome add-on? Basically, the Chrome software reporter tool is an executable file that runs once a week and reports the scanned results to the Chrome. To be precise, the tool scans the system to check for the unwanted software applications that may be interfering with chrome browsing experience. Also, the tool reports the Chrome about unexpected advertisements or during the incidents like site crashes. Based on the reports, Chrome then prompts the user to run Chrome cleanup tool as part of the scanning process.
Where is Chrome Reporter Tool
Primarily, Software reporter tool is the executable file that is present in Chrome app data folder as Software_reporter_tool.exe. The Chrome app data folder contains the information about the user’s Chrome profile like browser settings, bookmarks, saved passwords and other users information. Amid these many user data, the .exe file is visible under the SwReporter folder in the Chrome app data folder.
Is Chrome Reporter Tool Safe to use
As a user, you may be apprehensive about the privacy. If you are unsure about your network privacy, you can simply check the authenticity of the tool by simply moving the cursor on the .exe file. You may notice that the component is digitally signed by Google with the file description as Chrome Cleanup tool. So this tool is completely safe. It is worth mentioning that the reporting tool doesn’t have any network communication. The only job of this tool is to report Chrome about the software that may not be working conventionally with chrome browser.
Chrome Software Reporter Tool vs Chrome Cleanup Tool
In other words, Software reporter tool is associated with Chrome cleanup tool. Yes, you got it right! Both the tools are identical.Then you might be wondering what could be the need to have them as a separate tool? According to Google, the software reporter tool reports the scans to Chrome and based on the scanned reports, the Chrome browser prompts the user to remove the unwanted software through Chrome cleanup tool.
While the tool helps in removing obstacles that could hurdle the browser experience, many users are mainly worried about its enormous CPU consumptions on running the tool in the background. The tool could run approximately 20 minutes which may slow down your other activity in the system. It’s worth stating that, unless you run the third party software that constitutes a problem on a regular basis, this tool may not be a source of the intrusion.
Disable Google Chrome Software Reporter Tool
You find the Software Reporter Tool under the following path in Windows 10 and older versions of Windows:C:\Users\USERNAME\AppData\Local\Google\Chrome\User Data\SwReporter\VERSION\software_reporter_tool.exe
The caveat here is that you’ll need to do a little extra setup by first creating a policy object for those users. You can read all about that in our guide to applying local Group Policy tweaks to specific users. You should also be aware that group policy is a pretty powerful tool, so it’s worth taking some time to learn what it can do. Also, if you’re on a company network, do everyone a favor and check with your admin first. If your work computer is part of a domain, it’s also likely that it’s part of a domain group policy that will supersede the local group policy, anyway.
The process for allowing or restricting apps with the Local Group Policy Editor is almost identical, so we’re going to show you how to restrict users to only running certain apps here and just point out the differences. Start by finding the MSC file you created for controlling policies for those particular users. Double-click to open it and allow it to make changes to your PC. In this example, we’re using one we created for applying policy to all non-administrative user accounts.
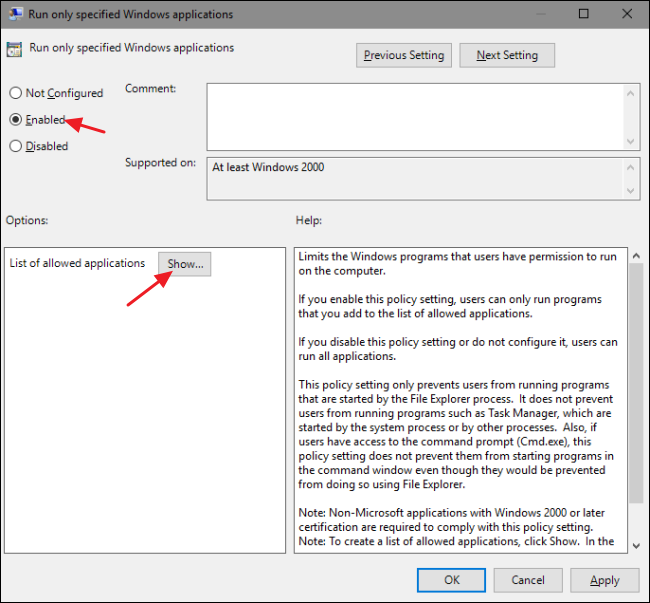
In the Group Policy window for those users, on the left-hand side, drill down to User Configuration > Administrative Templates > System. On the right, find the “Run only specified Windows applications” setting and double-click it to open its properties dialog. If you want to block specific applications rather than restricting them, you would open the “Don’t run specified Windows applications” setting instead.

In the properties window that opens, click the “Enabled” option and then click the “Show” button.

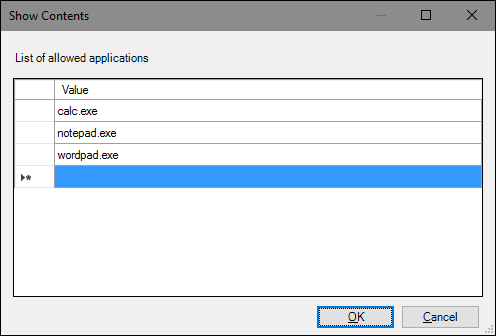
In the “Show Contents” window, click each line in the list and type the name of the excecutable you want users to be able to run (or the name of apps you want to block if that’s what you’re doing instead). When you’re done building your list, click “OK.”
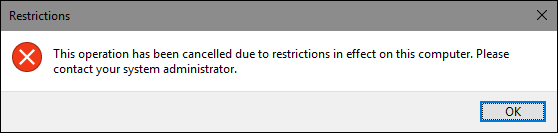
You can now exit the Local Group Policy window. To test your changes, sign in with one of the affected user accounts and try to launch an app to which the user should not have access. Instead of launching the app, you should see an error message.
If you want to disable your changes, just head back into the Local Group Policy editor by double-clicking your MSC file again. This time, change the “Run only specified Windows applications” or “Don’t run specified Windows applications” options to “Disabled” or “Not Configured.” This will turn the setting off entirely. It will also reset your list of apps, so if you want to turn it on again, you’ll need to retype that list.
It is now called the Chrome Cleanup Tool.
But that too has been discontinued now. You need to use Chrome’s Malware Scanner & Cleanup Tool.
The user is completely unaware of the existence of this component, unless and until the user deliberately searches for software reporter tool. So the question is what is the role of this Chrome add-on? Basically, the Chrome software reporter tool is an executable file that runs once a week and reports the scanned results to the Chrome. To be precise, the tool scans the system to check for the unwanted software applications that may be interfering with chrome browsing experience. Also, the tool reports the Chrome about unexpected advertisements or during the incidents like site crashes. Based on the reports, Chrome then prompts the user to run Chrome cleanup tool as part of the scanning process.
Where is Chrome Reporter Tool
Primarily, Software reporter tool is the executable file that is present in Chrome app data folder as Software_reporter_tool.exe. The Chrome app data folder contains the information about the user’s Chrome profile like browser settings, bookmarks, saved passwords and other users information. Amid these many user data, the .exe file is visible under the SwReporter folder in the Chrome app data folder.
Is Chrome Reporter Tool Safe to use
As a user, you may be apprehensive about the privacy. If you are unsure about your network privacy, you can simply check the authenticity of the tool by simply moving the cursor on the .exe file. You may notice that the component is digitally signed by Google with the file description as Chrome Cleanup tool. So this tool is completely safe. It is worth mentioning that the reporting tool doesn’t have any network communication. The only job of this tool is to report Chrome about the software that may not be working conventionally with chrome browser.
Chrome Software Reporter Tool vs Chrome Cleanup Tool
In other words, Software reporter tool is associated with Chrome cleanup tool. Yes, you got it right! Both the tools are identical.Then you might be wondering what could be the need to have them as a separate tool? According to Google, the software reporter tool reports the scans to Chrome and based on the scanned reports, the Chrome browser prompts the user to remove the unwanted software through Chrome cleanup tool.
While the tool helps in removing obstacles that could hurdle the browser experience, many users are mainly worried about its enormous CPU consumptions on running the tool in the background. The tool could run approximately 20 minutes which may slow down your other activity in the system. It’s worth stating that, unless you run the third party software that constitutes a problem on a regular basis, this tool may not be a source of the intrusion.
Disable Google Chrome Software Reporter Tool
You find the Software Reporter Tool under the following path in Windows 10 and older versions of Windows:C:\Users\USERNAME\AppData\Local\Google\Chrome\User Data\SwReporter\VERSION\software_reporter_tool.exe
NOTE - USE Local Group Policy Editor
Pro and Enterprise Users: Block or Restrict Apps with the Local Group Policy Editor
If you use the Pro or Enterprise version of Windows, blocking or restricting apps can be a little easier because you can use the Local Group Policy Editor to do the job. One big advantage is that you can apply policy settings to other users–or even groups of users–without having to log in as each user to make the changes the way you do when making these changes with Registry Editor.The caveat here is that you’ll need to do a little extra setup by first creating a policy object for those users. You can read all about that in our guide to applying local Group Policy tweaks to specific users. You should also be aware that group policy is a pretty powerful tool, so it’s worth taking some time to learn what it can do. Also, if you’re on a company network, do everyone a favor and check with your admin first. If your work computer is part of a domain, it’s also likely that it’s part of a domain group policy that will supersede the local group policy, anyway.
The process for allowing or restricting apps with the Local Group Policy Editor is almost identical, so we’re going to show you how to restrict users to only running certain apps here and just point out the differences. Start by finding the MSC file you created for controlling policies for those particular users. Double-click to open it and allow it to make changes to your PC. In this example, we’re using one we created for applying policy to all non-administrative user accounts.
In the Group Policy window for those users, on the left-hand side, drill down to User Configuration > Administrative Templates > System. On the right, find the “Run only specified Windows applications” setting and double-click it to open its properties dialog. If you want to block specific applications rather than restricting them, you would open the “Don’t run specified Windows applications” setting instead.
In the properties window that opens, click the “Enabled” option and then click the “Show” button.
In the “Show Contents” window, click each line in the list and type the name of the excecutable you want users to be able to run (or the name of apps you want to block if that’s what you’re doing instead). When you’re done building your list, click “OK.”
You can now exit the Local Group Policy window. To test your changes, sign in with one of the affected user accounts and try to launch an app to which the user should not have access. Instead of launching the app, you should see an error message.
If you want to disable your changes, just head back into the Local Group Policy editor by double-clicking your MSC file again. This time, change the “Run only specified Windows applications” or “Don’t run specified Windows applications” options to “Disabled” or “Not Configured.” This will turn the setting off entirely. It will also reset your list of apps, so if you want to turn it on again, you’ll need to retype that list.
Comments
Post a Comment